

 This is FUSION")

")
")
")


")


Protune is about what is done in the post editing and pulling details out of the shadows. Here’s all that you need to know about the new Protune features in the HERO5 series.
MORE ACE TIPS
Generally speaking, when Protune is turned on the data files are bigger, and stores raw information. At first glance, the recorded video with Protune turned on looks to be dull, washed out, versus protune turned off footage looks more vibrant. Protune is better utilized if you plan on post editing the raw shots in an editing suite like Adobe Premiere or iMovie.
When using editing suites like Premiere be sure to enable settings for brightness / contrast, fast color corrector, saturation and unsharp mask. You should notice the real difference in footage after applying the changes.
In the new HERO5 camera, Protune has up quality and bitrate to 60Mbps from its previous 45Mbps.
Quick sure shot settings for Protune
White balance – Temperature (cool blue to warm yellow).
Set to auto for best results
ISO – For low-light situations lower ISO setting to 400.
Imagery will appear to be darker in low-light, but cleaner and less noisy. You can bump ISO up to 6400 but at the expense of adding extra noise to your footage. It is best to have ISO set to 400 to attain that clean and nice contrasting video footage.
Sharpness
Digital sharpness settings include low, medium, and high.
Best to keep settings low – add more later in post editing.
Color Profile
The default is set to GoPro Color (saturate). Flat is also available and that setting brings down saturation.
Exposure Value Compensation (E.V Comp)
This setting is basically for auto-adjusting the exposure levels on the GoPro. It adjusts either below or above the auto exposure. The settings are great for tweaking your shots to get the exposure levels you want.

Quick resolution cheats
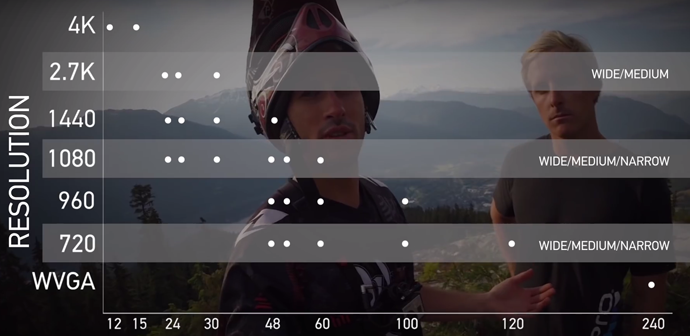
4K is huge for panorama, and sunset shots.
2.7K is enabling high-res crisp videos. Being steady is key, and for scenes without slow motion.
1440 is a great mode for POV. It is essentially 1080p with 4:3 aspect and is great for chest cam, head cam filming.
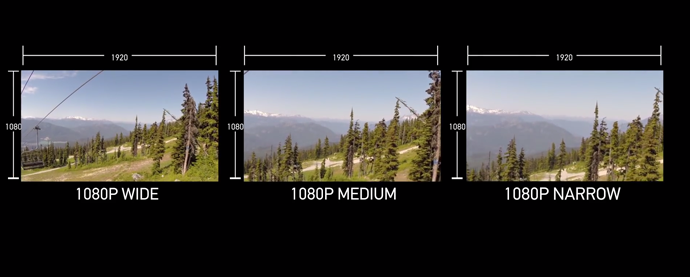
1080p is super versatile, fluid for slow motion, and non-body mounted footage. It is also great for follow cam, b-roll, and getting that perfect shot.
WDR Photo Capture
If you’re looking to capture a scene that has intense shadows and bright white, WDR is a setting that uses the 12-bit raw source to tone map the photo and present a wider dynamic range than a standard JPEG. It does a great job of evening out a scene that would otherwise blow out or be too crushed in the blacks. WDR can be accessed & enabled by swiping past ProTune in the tray on the right side. WDR and RAW cannot be enabled at the same time.
Stereo Microphones & ProTune Audio
The HERO5 has an all new audio setup, utilizing 3 different microphones to suppress wind and give proper stereo audio. It’ll constantly monitor all 3 mics and use the data to pull the best sounding bands from each. It also uses the 3 mics to triangulate the location of sounds to figure out a proper left and right track to build the stereo audio. There are two new settings to manipulate the audio: Manual Audio Control and ProTune Audio.
Manual Audio Control
By default, the HERO5 automatically switches between wind reduction audio & stereo audio. It’ll still kick out a stereo track but it won’t always be triangulating location. If you enable manual audio control, you can choose to lock your GoPro in either wind reduction mode or stereo audio mode. You access manual audio control by swiping the right tray out and scrolling all the way to the end past ProTune, EIS, and Auto Low Light.
ProTune Audio Track
A new feature in the HERO5 is the addition of the ProTune audio track. If enabled, your GoPro will save an additional high quality audio .wav file adjacent to your video file on your SD card. The standard GoPro audio on your video file will have a good amount of processing done to it – auto gain control (AGC), wind reduction (if manual audio control is turned off), and more. The ProTune audio track allows you to control this processing in an additional audio file. You can control the level of audio processing you want done to this separate .wav file with 3 different settings: Low, Medium, & High.
Low – Applies minimal processing to the audio file. Saves a .wav file with 3 separate audio tracks – one for each mic on the camera.
Medium – Applies some processing, including your manual audio choice if enabled (stereo or wind).
High – Fully processed audio (matches the audio that you’ll find attached with your video – but higher quality).
Expanded Video & Photo Control with ProTune
Lastly, we were given some exciting ProTune photo and video controls in the latest HERO4 firmware upgrade, but I will briefly outline them here since they come standard in the HERO5. They are ISO limiting in Photos and manual shutter/ISO in video. Both of these settings should be thought of as pretty pro-level adjustments.
ISO Limits on Photos
You can now set minimum and maximum limits for the ISO in all photo modes. This allows greater control over shutter times and quality of your photos. If you need fast action and don’t mind the quality loss of high ISO, you could set higher minimum limits to force photos into higher ISO. For example, if I set my minimum and maximum to 100, the camera is going to look to a longer shutter time to make up for the need for light. In a test I did in my house, at a 100 min & max, the shutter speed was 1/50 sec. Setting the min & max to 1600, the shutter speed was 1/850 sec (~20x faster). Utilizing this in the field, you can either force the camera into longer exposures with higher quality (low ISO), or force fast shutter speed to pause action without blur.
Manual Shutter & ISO Lock in Video
A huge new feature for the pro content creator is manual shutter lock and ISO lock. In ProTune video, you now have the option to leave the shutter at auto, or lock it at the speed of the frame rate plus 3 additional stops down (multiples of the frame rate). For example, if I’m shooting at 4K-30, I can lock the shutter speed at 1/30, 1/60, 1/120, or 1/240. From here, you can set your ISO limit, or lock the ISO for full manual exposure control. Currently if you’re in auto shutter, you can only limit/lock the ISO to a minimum of 400. Once you lock the shutter, it will enable you to limit or lock the ISO down to 100.
Video from GoPro Tutorials
 This is FUSION")

")
")


 This is FUSION")

")
")